How to Mount a TV to a Wall
Sitting up straight for two hours of watching TV can be a real neck strain. TV Mounting ideally at eye level, can help.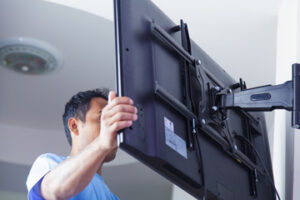
To do it right, though, you’ll need to know a few key terms and standards. Familiarizing yourself with these can save you a lot of time, money, and frustration at the time of installation.
If you’re moving from a TV stand to a wall mount, the first thing you’ll need to do is pick a mount that will work for your space. There are many different types, ranging from basic fixed mounts that only take up 2 inches of space to articulating mounts that can move the TV around the room and extend up to 3 feet. The type of mount you choose will depend on your room layout, viewing angle preferences, and who the TV is meant for.
Most TV wall mounts are rated by the screen size and weight they can hold. Look for this information in the product description when shopping online. The more specific the information, the easier it will be to narrow your choices.
Another factor to consider when choosing a TV mount is whether you want the mount to be able to tilt or move left to right. If you’re planning on watching TV from a bed or couch, a tilting mount is the best choice because it will let you adjust the angle of the screen to improve line of sight and reduce glare. However, if you plan to use your TV in the kitchen or dining room, a full-motion mount would give you more flexibility for watching from multiple locations in the room.
Lastly, keep in mind that all flat-screen TVs require cords to power the unit, which will need to be routed from the TV to an outlet somewhere in your home. Having a wired TV can be an eyesore, but there are many options available to hide the cords in order to maintain a clean, finished appearance. These include covers that snap over the wires, kits to run them behind a wall, and various other ways to conceal and organize them.
Choosing the right TV mount can help eliminate problems down the road. After all, the last thing you want is to finish mounting your new TV and then discover that it doesn’t sit correctly or that the mount isn’t safe for the type of television you’ve chosen.
Preparing the Wall
Before you attach the TV mount to the wall, it is important that you take the time to survey and prepare the wall. This can save you a lot of headaches down the road. It is also helpful in ensuring that you don’t end up drilling holes into pipes, electrical outlets, or other vital structures within your home.
Ideally, you want to mount the TV in a spot that will allow it to be seen from most of the seating in your living room or home theater. This will help ensure that everyone has a good viewing angle and is able to comfortably watch TV. If you are having trouble deciding on the perfect location, you should consult a professional to assist you.
Once you have a location in mind, the next step is to determine how high to mount the TV. Most people recommend a height of around eye level, but this can vary depending on the size of your screen and the seating arrangement in your home. If you are unsure of how to determine the ideal mounting height, run a strip of low-stick painter’s tape from one corner of your screen diagonally across the opposite wall and mark where the intersection of the two strips is. This is the center of your screen and should be where you would like to mount it on the wall.
The next step is to locate the stud locations in the wall using a stud finder or another method of finding studs. Most TV mounts will have a map of stud locations that will be useful in locating the correct placement for your bracket. Using the map and/or your stud finder, mark where the screw holes need to be placed on the wall.
It is often helpful to have a partner for this part of the process, as it can be difficult and dangerous to hold the TV up to the wall while you make your marks. Once the holes are marked, you can begin to mount your bracket on the wall. You will need to follow the instructions provided with your brackets, as these can vary between products.
Mounting the TV
Leaving your TV on a stand or table can make it easy for kids and pets to knock it over. That’s not only dangerous for the TV, but it can also cause damage to furniture and walls. Mounting your TV to the wall helps prevent accidents like this and saves you money on expensive furniture replacements.
First, you need to decide where you want your TV mounted. A popular choice is above the fireplace, but you can mount your TV in any spot you prefer. Be sure to consider the viewing angle and how the room will look with the new setup before making your decision. Once you’ve picked a location, mark it with painter’s tape. Then, use a stud finder to locate the studs in the wall. Make sure the studs are spaced properly so you can attach the mounting bracket to them.
Once you’ve located the studs, drill pilot holes into them using a power drill and masonry bit. Then, hold the mounting bracket up to the wall and use a level to make sure it’s straight. Next, screw the mounting screws into the pilot holes to secure the bracket to the wall. Be sure to tighten the screws evenly and securely.
A good tip is to use a socket wrench instead of a power drill for tightening screws in drywall. This will help you avoid overtightening, which can damage the drywall. Once the screws are in, you can finish the rest of the installation.
If your TV has ports on the back that need to be accessed frequently, consider getting a mount that can telescope outward so you can reach the cables easily without unmounting the television. Some mounts come with cable management systems, too, which can help keep your home looking clean and organized.
Once the bracket is on the wall, connect it to the TV using the included hardware. Some mounts may require you to remove the plastic plugs from the back of the TV and screw them into place, while others will simply clip into place. Be sure to follow the instructions for your specific mount to ensure you’re connecting everything correctly.
Troubleshooting
When mounting a TV on the wall, there are various issues that can occur. These can include problems with the installation, positioning, and audio and video quality. These issues can be easily fixed with proper troubleshooting. For instance, you can try reseating connections, changing settings, or adjusting hardware. Alternatively, you can use acoustic treatments or install an external sound system to improve the sound performance of your TV.
In addition to ensuring that the mounting location is stable and secure, you should also make sure that there are electrical outlets nearby to avoid the need for long and visible cords. Using cable management solutions and hiding wires behind walls or baseboards can help you achieve this goal. Additionally, you can minimize glare and other environmental factors by adjusting the viewing position and screen size.
Some of the most common problems during TV mounting involve issues with the mounting hardware or the wall’s stability. For example, a loose mount may fall off the wall or cause damage to other areas of your home. A loose mount can also lead to image distortion, poor audio performance, and other issues. To prevent these issues, it is important to ensure that the mounting bracket is compatible with your TV and that all screws and bolts are tightened properly.
Another problem is that a TV mount can be installed crookedly on the wall. This can happen if the mounting plate is not attached to the studs correctly or if the vertical hooks are not aligned with the back of the television. In this case, it is recommended to use a level or tape measure to determine the center or core part of each set of holes on the wall. If the mount is crooked, you will need to adjust the horizontal hooks and the arm of the mount accordingly.
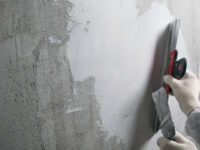
When a mount is not attached to the wall correctly, it can leave holes in the wall that need to be filled before repainting or patching. For small holes, you can use wood putty or drywall mud. For larger holes, you can use epoxy filler that dries quickly and does not shrink over time.